Showing posts with label Tutorial.. Show all posts

Friday, October 3, 2014

Chipping yellow armour.

Short Tutorial on how I Chip Yellow Armour.....


Hi guys this is just a short post regarding how I achieve chipped yellow armour for my Scythes, I was asked on a Forum that I visit from time to time how I did this, I gave a brief to the point explanation but thought I would explain further via a blog post, this is by no way an expert tutorial as I'm just starting out myself in the world of  hobby painting and building but I can see the value of this as I am sure I'm not the only person taking the first few steps down the chipping/weathering road.

Firstly what I do is prime the model part, for this Dreadnought leg plate I primed it with GW's white spray undercoat, I then paint it with the desired colour, the colour I've used here is Army Painters Daemonic Yellow, make sure you thin the paint as several thin coats are better than one thick one.

Next I use grey ultra fine Scotchbright, I've used sponge in the past but find the impression it makes on the model is not as fine and random as Scotchbright.

I then dab a small piece of Scotchbright using tweezers into the desired colour, the one I've used here is GW's Rhinox Hide, I then dabbed most of the paint off using kitchen paper and dabbed it onto the model part making sure not to go too heavy to start with, I've mostly worked the Rhinox Hide around the edges of the leg plate as I think this would be the place where most wear would occur.

I the did the same overlapping the Rhinox Hide with Leadbelcher making sure I used slightly less so I could still see the initial Rhinox Hide chip's.

This is the finished effect I achieved using this simple technique, its quick and easy and I think quite effective.

I used the same technique on the central shield of this banner pole in the picture below.


Tuesday, August 5, 2014

Heat stained 40k Gun barrels.

  Easy Gun Barrel Staining......

Hi Guys, well Im nearing the end of my Dreadnought project and when it came to painting the Assault cannon I thought I would go the extra mile in painting the barrels.

Normally I just apply Leadbelcher and wash with a drybrush afterwards and this is fine but for this Dreadnought I wanted a little more and so I searched the Internet for inspiration and found this picture of a heat stained exhaust, it perfectly illustrates the colour bands during extreme heat.


Replicating this banding was relatively easy, clearly I've not gone as bright with my effort as I just wanted to hint at the colour distortion.

First off I painted the barrels as normal, Leadbelcher, Nuln Oil wash and drybrush belcher.


Leaving a small area of Leadbelcher free from ink at the dangerous end I applied in order working back, Drakenhof Nightshade, Druchii Violet and Seraphim Sepia in equal parts.

When dry I diluted Sepia with water and dragged it backwards from the original Sepia wash, but not past half way, the Sepia watered down helped blend the colour into the Lead belcher as though the metal had started to cool at that point.


I then drybrushed the end with Leadbelcher making sure I blended into the first wash, Drakenhof Nightshade, best I could.

Finally I drybrushed a little Runefang Steel to the extreme edges at the end of the barrels.


Wednesday, July 16, 2014

Space Hulk Bases pt2.

  Sci Fi Deck Bases part 2.....

Hi Guys, well I've completed a set of Sci Fi deck bases from Dark Art Miniatures and I've got to say Im rather happy with them, only one of these bases had any sort of number/letter incorporated within it so I made a trip down to my local hobby store and bought a set of rubber stamps, really easy to use just paint the stamp a desired colour and stamp the base, I washed the stamped numbers afterwards with Earthshade to weather it slightly, I did this to make sure I had yellow on all bases to tie them together.


I thought I might give OSL lighting a shot for the first time on the larger base and think it turned out quite well, all I did was gently drybrush Moot Green in the direction the light would fall.


Tuesday, July 15, 2014

Space Hulk Bases pt1.

  How to paint simple Sci Fi Deck Bases.....

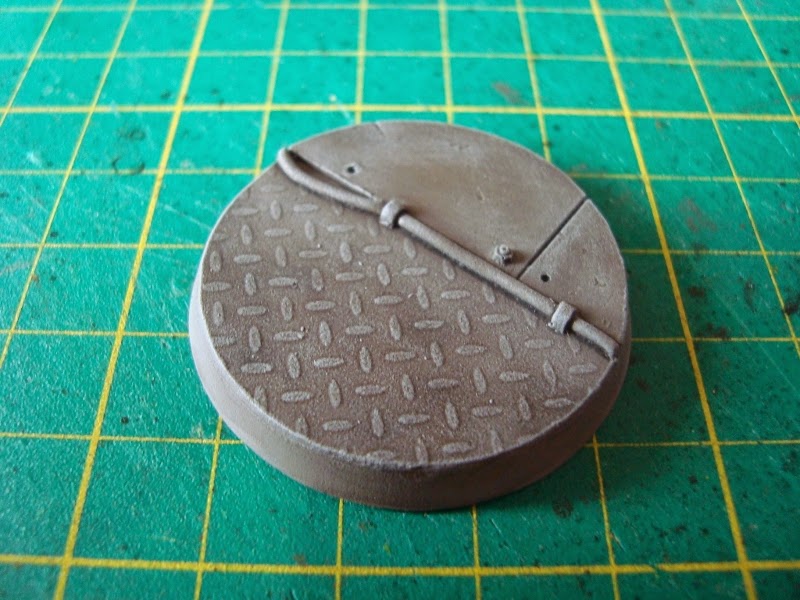
Hi Guys I've had these Dark Art Miniatures sci fi deck bases for a while and now think its time to paint them as I have a little project in mind, more on that later, but for now I thought I would post a little Tutorial on how to paint these bases simply and effectively without taking any attention away from the models that will sit upon them.

The moulded bases themselves are for the most part of good quality, there were a few air holes which I filled with green stuff and a piece of the small cable on the larger base had come away, again this was easy to rectify, so all in all I was happy with them.

I will only be using a few colours and a couple of washes to achieve this effect and the main technique used is drybrushing so I think it would be easy to replicate these bases if you so wished.

First of all I undercoated with grey auto primer from Halfords, Im using this as my basecoat.

I then washed the whole base with a generous amount Nuln Oil, when dry washed it again with Agrax Earthshade.

Again when dry I drybrushed the whole base in order with Skavenblight Dinge, Dawnstone and Administratum Grey paying particular attention to small raised detail and the rim with the Admin Grey.

I then gave the power cable a base coat of Averland Sunset.

I painted the base coated power cable with Flash Gitz Yellow and washed it with Earthshade, I also used Earthshade along the sides of the power cable and on various bits of detail such as around the bolt holes and along the deck plate gap.

I then applied a little extra drybrushing with Administratum Grey and painted the base rim with Vallejo model colour black, the rest of the colours are from Games Workshops range.

Monday, September 30, 2013

How to.... Martian Bases.


Hi, this is my first "how to..." , first of many i hope, most of the techniques I've used here can be found elsewhere on the net, so im not making out like im an expert or anything just an enthusiastic amateur, anyhow ive brought it all together here for you guy's to look at, hope you enjoy it.

Stage 1 preparation.


I wanted my broadside to be standing on something on top of the base and so decided on a large plastic cog that i removed from a child's broken toy, with the broadsides legs not been able to reposition easily  i also needed to build a small mound so the model didn't look too lopsided on completion.

I used three pieces of 1mm plasicard, each slightly smaller than the other the top one only slightly bigger than the broadsides left foot. I then glued them into position.

The theme im going for is rusted battlefield debris on a red martian planet, and so i cut at angles two pieces of what i think look like a variation on construction RSJ's and also a ammunition box from a 40k tank kit, i added a handle from different ammo box for extra detail and stuck it to the exposed side of the large box.

After the gluing process i used green stuff to smooth out the small mound and pushed it up against the other various pieces of detail I've added, trying to make it look like when the sands added that it has blown up against them, i also drilled and glued in two small metal rods, from a paper clip, to aid the gluing process when both the model and base are finished.


Stage 2 undercoat.


I then used blutac to stick the base to a makeshift paint stick and sprayed it with GW's skull white in a well ventilated area.

You could just as easily of used the black undercoat spray, i used white because its better visually for this article.

Always use a proper mask when using aerosols.


Stage 3 basecoats.


I basecoated all the areas i wanted rusted with Rhinox Hide, i also painted various bits of detail on the ammo box with Leadbelcher and the strap on the handle with Steel Legion Drab.


Stage 4 stippling / ink wash.


I stippled in turn Mournfang Brown, Troll Slayer Orange and Leadbelcher to random areas that are painted Rhinox Hide, i also paid attention to the edges, be careful not to add too much, its supposed to be rusted and so mostly shades of brown, i then washed the entire area with Agrax Earthshade.   

Then i edge highlighted with Leadbelcher and added a little highlight to the ammo box strap with Karak Stone.


Stage 5 sand.


Using PVA glue and a old bush i carefully painted the base where i wanted the sand to go, (this is where a black undercoat spray would of made it better to see the glue), i then placed a few stones/rocks on and sprinkled sand over and left it to dry.


Stage 6 martian basecoat.


When the PVA was dry i painted the sand area my red martian colour which is a near 50/50 mix of Khorne Red and Skrag Brown, slightly more in the browns favour.


Stage 7 drybrush.


I then drybrushed the whole red martian area including the rocks with Cadian Fleshtone, and painted the sides of the base black.

TIP, the long grasses that i've stuck to my base in the completed model picture i had to make for myself, trust me i couldn't find any like that anywhere, they where made by cutting small clumps from an old shaver's brush and gluing to the base using PVA.


A final wash of GW's Reikland Fleshshade dull's the pinkish highlights down and add's depth and shade to the base, sorry no picture for this stage.