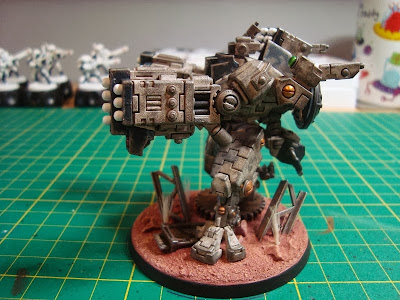
Hi, this is my first "how to..." , first of many i hope, most of the techniques I've used here can be found elsewhere on the net, so im not making out like im an expert or anything just an enthusiastic amateur, anyhow ive brought it all together here for you guy's to look at, hope you enjoy it.
Stage 1 preparation.
I wanted my broadside to be standing on something on top of the base and so decided on a large plastic cog that i removed from a child's broken toy, with the broadsides legs not been able to reposition easily i also needed to build a small mound so the model didn't look too lopsided on completion.
I used three pieces of 1mm plasicard, each slightly smaller than the other the top one only slightly bigger than the broadsides left foot. I then glued them into position.
The theme im going for is rusted battlefield debris on a red martian planet, and so i cut at angles two pieces of what i think look like a variation on construction RSJ's and also a ammunition box from a 40k tank kit, i added a handle from different ammo box for extra detail and stuck it to the exposed side of the large box.
After the gluing process i used green stuff to smooth out the small mound and pushed it up against the other various pieces of detail I've added, trying to make it look like when the sands added that it has blown up against them, i also drilled and glued in two small metal rods, from a paper clip, to aid the gluing process when both the model and base are finished.
Stage 2 undercoat.
I then used blutac to stick the base to a makeshift paint stick and sprayed it with GW's skull white in a well ventilated area.
You could just as easily of used the black undercoat spray, i used white because its better visually for this article.
Always use a proper mask when using aerosols.
Stage 3 basecoats.
I basecoated all the areas i wanted rusted with Rhinox Hide, i also painted various bits of detail on the ammo box with Leadbelcher and the strap on the handle with Steel Legion Drab.
Stage 4 stippling / ink wash.
I stippled in turn Mournfang Brown, Troll Slayer Orange and Leadbelcher to random areas that are painted Rhinox Hide, i also paid attention to the edges, be careful not to add too much, its supposed to be rusted and so mostly shades of brown, i then washed the entire area with Agrax Earthshade.
Then i edge highlighted with Leadbelcher and added a little highlight to the ammo box strap with Karak Stone.
Stage 5 sand.
Using PVA glue and a old bush i carefully painted the base where i wanted the sand to go, (this is where a black undercoat spray would of made it better to see the glue), i then placed a few stones/rocks on and sprinkled sand over and left it to dry.
Stage 6 martian basecoat.
When the PVA was dry i painted the sand area my red martian colour which is a near 50/50 mix of Khorne Red and Skrag Brown, slightly more in the browns favour.
Stage 7 drybrush.
I then drybrushed the whole red martian area including the rocks with Cadian Fleshtone, and painted the sides of the base black.
TIP, the long grasses that i've stuck to my base in the completed model picture i had to make for myself, trust me i couldn't find any like that anywhere, they where made by cutting small clumps from an old shaver's brush and gluing to the base using PVA.
A final wash of GW's Reikland Fleshshade dull's the pinkish highlights down and add's depth and shade to the base, sorry no picture for this stage.
.jpg)
.jpg)
.jpg)
.jpg)
.jpg)
.jpg)
.jpg)
.jpg)


.jpg)
