Thursday, July 6, 2017

More hobby progress.

Hi guys, Well it's not be the weather for it lately in sunny Leeds but I have been slowly working on my breachers, not a lot but getting there.....no really i am.

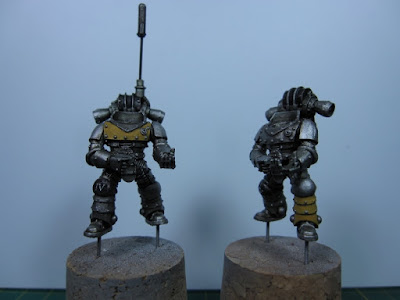
What i have done is to add a few more parts to the Moritat aka "Gunslinger", Just a few bits but i think it all adds to the look and feel of the miniature, So then just the Iron Skull to the left shoulder pad and some small packs and grenades around the Moritats waist, also got the base coat down, Time for the fun stuff to start now.


I have shock horror finished all their bases though, That's for the twenty Breachers and one Moritat base (front right), As always with these wasteland bases I'm very happy with the look, So easy to do....bit of dry brushing and weathering powders job done, I've been asked on Face Book how i paint them so will do a tutorial soon in case anyone else is interested....keeps the blog ticking anyhow which is always good.


So then that's it for now, Looking forward to the Forge World event next month and are really hoping that we see Adeptus Titanicus, not holding my breath though but are saving my penny's.

Happy painting guys.

Wednesday, June 7, 2017

WIP: Iron Warriors Breachers update Part 2.

Hi guys well I've finally started getting some paint on my much loved breachers.

The effort put in to get twenty marines to this stage is thankless as what your left with at base coat stage is just that base coated miniatures....so much time and graft put in but hey the hard work is over and soon time for the fun stuff.


Anyhow borderline whinge over I'll get on, I may have in a bid to speed things up shot myself in the foot, I usually leave off the helmets, pads and guns to paint separate to the main torso but with the breachers having shields as well I thought in my wisdom why not glue the pads and helmets leaving just the shields and guns...don't want too many separate components after all plus it will be quicker right, Well guys I'm now thinking I should of left the pads off because its going to be difficult getting the gold paint in there, Well I'll see and you live and learn.

Also started on their bases, I've built and primed 21, Yeah I only need twenty for the two squads but it's a bakers dozen kind of  thing which I thought would be prudent after the debacle with the Volkite squad bases, Don't ask.


Bit of a pain as I wanted to crack on on with the bases today then realised I was out of the darkest grey I needed so I started the first stages of tarnishing the metal on my breachers, This is a slow process but one that I've found quite effective for the look I'm after. 


Check the front three marines for the colour change, So then three down only seventeen more to go before I start on the second stage of washes.

That's it for now, Happy painting.

WIP: Iron Warriors Breachers Part 1.

Tuesday, May 30, 2017

SHOWCASE: Iron Warriors Tactical Squad.

Hi guys, Well these posts are coming thick and fast lately, Not like me at all.

Really chuffed with this Tactical squad and so glad it's finished, Was waiting on the trip to Warhammer Fest for a few more arrow transfers I needed but sorted now.


Close up of the Sergeant.


...and the Nuncio-vox Marine.


Down the line I'm thinking I'll add five more Marines with Legion Vexilla to max out the squad but that's a while off got other squads and tanks to paint first. Well that's it for now hope you like em.

Happy painting.

Sunday, May 28, 2017

WIP: IW's Legion Moritat.

Hi guys, Well then ever since the Legion Moritat Consul went up for sale on the Forge World site I knew I had to have one for the 188th Grand Company.


Trouble is, Well for me and my needs anyhow is that the Mk of armour the original miniature comes in, It doesn't really gel with my idea of what Iron Warriors should look like, Way too new for me so thought I would kit-bash one instead.


The base model of this Kit-bash is Narik Dreygur of the Iron Warriors with a converted Kharn (World Eaters) helmet, I used a Mk II jump pack and the original Volkite Serpenta weapons, I was thinking of using a couple of Volkite chargers but thought no he's a specialist and would have the best made weapons so kept them in.

Think I'll be magnetising the jump pack with a view to him maybe joining a Destroyer squad which won't have them ...but that's all down the line much later.

I still have a few bits to add to the base and also some grenades and maybe a knife to add to the miniature but you get some idea here of what he will look like, That's it for now guys.

Happy Painting.


Saturday, May 27, 2017

Warhammer Fest 2017: Heresy staying 7th?

Hi guys well I've had a great time at the fest today, here's a few photos of what interested me enjoy.


......and painted.


May just of found the miniature for my last Heavy Support slot....will be better in silver, Love that gun!!

Awesome Titan display.


Read it yourself guys.......


And the best of the rest, Well in my opinion anyway.


That's it for now cheers, Happy painting.

Tuesday, May 23, 2017

H.O.W. to: Iron Warriors Hazard Stripes.

Hi guys, I've been asked a few times how I paint my hazard stripes so thought I would knock up a little post explaining how I achieve painting them.


Now then if your looking for nice crisp stripes straight out of the Iron Warriors armoury then you will be disappointed, My style of painting these mighty Astartes is based on battle worn armies of the IV Legion.

Here's a list of paints used.
  1. Averland Sunset.
  2. Yriel Yellow.
  3. Casandora Yellow.
  4. Leadbelcher.
  5. 50/50 mix of Nuln Oil and Agrax Earthshade.
  6. Vallejo mahagony.
  7. Vallejo Black.

First up I get my final silver colour down with all the shading and so on that I'm happy with then crack on with painting in detail including the hazard stripes, You can see in this photo that I've already painted the packs and knee pads black.


I've found that for what I need (meaning the war torn look) I do not have to apply layer upon layer upon layer of thinned yellows to cover, Which is especially right as I'm only covering a light silver and not a dark colour, Add to that the weathering I do after means I really don't see the need for a perfect yellow base colour.

The first colour I use is Averland Sunset which is applied to all the areas where I want the stripes, I thin the paint with a little water to get a smooth finish, Again though guys I do thin paints but not that much as I'm not into tons of layers of yellow to cover....just don't let your paints dry and try to keep a wet edge on the miniature so work quickly.

The second coat is a mix of Averland and Yriel Yellow thinned with a little with water, The third coat is pure Yriel Yellow and the last coat I use is Casandora Yellow shade.

Painting a number of miniatures at one time will ensure that the first one you paint will be dry by the time you reach the end of the batch for the second coat ...and so on.

Averland Sunset..

Averland Sunset and Yriel Yellow.

Yriel Yellow.

Casandora Yellow.

So then now the yellow base colours down lets start on the stripes, I do all my stripes free hand which isn't as hard as it sounds, Yeah the first few marines I painted the strips were not so good but that all determines where the battle damage go which covers mistakes anyway.

Try to visualize where you want the stripes, how many and what thickness on the parts you have already prepared with yellow.

I use Vallejo Model Colour Black for the stripes thinned with water, Try to paint straight lines in one stroke then colour it in, Do this again and again methodically building up the stripes till you've finished an area, As always keep your paint wet don't let it start to dry out so add more water when needed, The paint will run off your brush much better and make it easier for you.


When I get to this stage I look at where the imperfections of the stripes are which will in turn determine where i put most of the weathering, damage, scratches etc.

I use Vallejo Mahagony (watered down a lot as it's a very strong colour) to shade the yellow slightly at the edges of the armour plates, I then drybrush Leadbelcher on those same edges all the way around clipping rivets and other detail.

When finished I wash the Leadbelcher areas with the 50/50 mix of Nuln Oil and Earthshade, I also add this to the creases of the armour plates around rivets and so on.

The final stage is to add a few scratches and paint tops of rivet heads with Leadbelcher then I'm done.


So then guys there you have it yeah its not perfect and there's a few stages before I reach the finish line but that's hazard stripes for ya and what makes our Legion unique.

Hope this has been helpful, Happy painting.