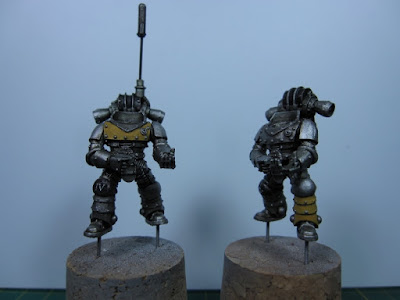
Hi guys, I've been asked a few times how I paint my hazard stripes so thought I would knock up a little post explaining how I achieve painting them.
Now then if your looking for nice crisp stripes straight out of the Iron Warriors armoury then you will be disappointed, My style of painting these mighty Astartes is based on battle worn armies of the IV Legion.
Here's a list of paints used.
- Averland Sunset.
- Yriel Yellow.
- Casandora Yellow.
- Leadbelcher.
- 50/50 mix of Nuln Oil and Agrax Earthshade.
- Vallejo mahagony.
- Vallejo Black.
First up I get my final silver colour down with all the shading and so on that I'm happy with then crack on with painting in detail including the hazard stripes, You can see in this photo that I've already painted the packs and knee pads black.
I've found that for what I need (meaning the war torn look) I do not have to apply layer upon layer upon layer of thinned yellows to cover, Which is especially right as I'm only covering a light silver and not a dark colour, Add to that the weathering I do after means I really don't see the need for a perfect yellow base colour.
The first colour I use is Averland Sunset which is applied to all the areas where I want the stripes, I thin the paint with a little water to get a smooth finish, Again though guys I do thin paints but not that much as I'm not into tons of layers of yellow to cover....just don't let your paints dry and try to keep a wet edge on the miniature so work quickly.
The second coat is a mix of Averland and Yriel Yellow thinned with a little with water, The third coat is pure Yriel Yellow and the last coat I use is Casandora Yellow shade.
Painting a number of miniatures at one time will ensure that the first one you paint will be dry by the time you reach the end of the batch for the second coat ...and so on.
Averland Sunset..
Averland Sunset and Yriel Yellow.
Yriel Yellow.
Casandora Yellow.
So then now the yellow base colours down lets start on the stripes, I do all my stripes free hand which isn't as hard as it sounds, Yeah the first few marines I painted the strips were not so good but that all determines where the battle damage go which covers mistakes anyway.
Try to visualize where you want the stripes, how many and what thickness on the parts you have already prepared with yellow.
I use Vallejo Model Colour Black for the stripes thinned with water, Try to paint straight lines in one stroke then colour it in, Do this again and again methodically building up the stripes till you've finished an area, As always keep your paint wet don't let it start to dry out so add more water when needed, The paint will run off your brush much better and make it easier for you.
When I get to this stage I look at where the imperfections of the stripes are which will in turn determine where i put most of the weathering, damage, scratches etc.
I use Vallejo Mahagony (watered down a lot as it's a very strong colour) to shade the yellow slightly at the edges of the armour plates, I then drybrush Leadbelcher on those same edges all the way around clipping rivets and other detail.
When finished I wash the Leadbelcher areas with the 50/50 mix of Nuln Oil and Earthshade, I also add this to the creases of the armour plates around rivets and so on.
The final stage is to add a few scratches and paint tops of rivet heads with Leadbelcher then I'm done.
So then guys there you have it yeah its not perfect and there's a few stages before I reach the finish line but that's hazard stripes for ya and what makes our Legion unique.
Hope this has been helpful, Happy painting.


Nice tutorial - the only thing i tend to add that you haven't covered would be an edge highlight along the black/yellow join. It's not necessary for the battle damaged look you're going for but can help the hazards stand out a bit more if you want a cleaner look.
ReplyDeleteCheers Nick, Yeah totally agree for the cleaner look.
DeleteAn excellent post. Thank you.
ReplyDeleteNo probs Phil hope it helps mate.
DeleteLovely work and a very concise tutorial. Good stuff!
ReplyDeleteCheers Mordian7th.
DeleteHello, thank you for sharing the tips! It is very helpful and informative.
ReplyDeleteAlso, it would be more practical when cleaning the residue using high pressure washers. Would love to see more updates.
Precision Water Blaster
You wouldn't by any chance have a tutorial on how to paint the iron part of the Iron Warriors?
ReplyDelete